Creating a Pretty Pay Stub Template,
Welcome back to our “how to make a pay stub” series. This is step 3. If you haven’t watched or read the first 2, you may need that, to get some numbers, and some calculations. If you feel comfortable with those, then let’s move on, and get some layout stuff going.
There is no defined way that a pay stub has to be shown. There is no law, mandating anything in this respect. Ultimately, your employer doesn’t even have to give you one, they can simply give you a check, and be done with it. But, they have realized it’s best, so that they minimize questions from their employee, as to why the pay stub is so low.
Here are two basic styles:
1. NEAT Pay stub:
It’s very basic, has been around forever, and lays out things pretty standard. This is really the beginners pay stub. You won’t see this style in modern day business, or anyone doing business with a computer, or a company that makes any decent money or has an accounting office. As everyone knows this style is something made from a beginner accounting software, like QuickBooks. But, big companies don’t use QuickBooks. They use things like SAP, or some proprietary software. Which will generate custom paystubs… Or, they just farm out payroll to big companies.
This brings in a more Corporate Pay stub. Again, this depends on where you are working. If it’s just a coffee shop, the NEAT style is fine.
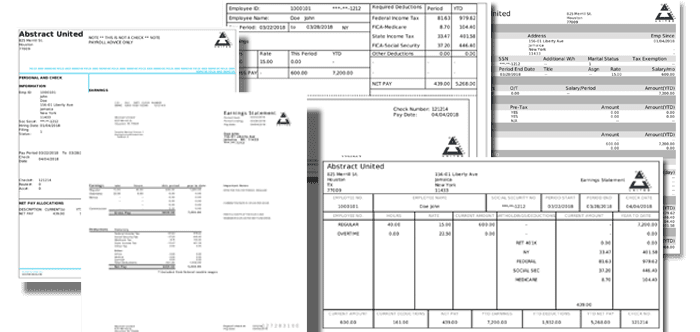
2. MODERN style paycheck:
It used to be the T-stub style, but, we’ve improved it and made it resemble something that would come from a big company.Take a look at it.
You can see, How this looks more and more like a clean paystub, even with the check at the bottom. Now, it is true, the check at the bottom should be removed, but, you can always put the word VOID on it, and tell them that you have direct deposit, which is always a nice touch.
So, what you have to do, is to create this in one of 2 ways.
1) Create an Excel Spreadsheet, and combine the columns, that you need, and line items.
2) Use Word, but the data in a table, and then draw in the boxes underneath.
Truly, the #1 option is the best way to go. It’s a little more time-consuming in the beginning, but, truly the best way in the long run. So, we will really focus on that. instead of just drawing it in. #1 option will allow for reuse, especially if you have multiple stubs. Again, don’t forget the math in that respect
So, If you look closely at that picture, you can count at least 6 columns. If you want to create a spacer between all of them, You could argue it’s 12 columns, just 6 of them are thin. And you could argue further, that on the right side, where the name and address is, there is even more. but, I don’t want to make this confusing, so, I’ll just call it 12.
If you are looking at excel, and see 12 columns, you won’t see what we see in the pic. But, that’s ok, cause it’s easy to change. Just place your mouse on the top bar, and move it left or right, to get the width you need. Your first column is earnings. but, it’s not at the top, it’s about 20 rows down.
On that row, next to earnings, put a label on RATE, and then next to that HOURS, then THIS PERIOD and then YEARLY. Those are the columns that you will put your numbers into. Now, above that… you still need your address and info. So, go ahead, and put those numbers in there Under earnings, type in the description, and type of earnings, like SALARY, or HOURLY, or OVERTIME, or COMMISSION.. etc… and fill in the appropriate numbers you want.
Here is where the math comes in, you must put in your YEARLY numbers- the number multiplied by the PERIODS. And that number is based on how many times you are paid… weekly, bi-weekly, etc… That calculation you have to do. If you are doing consecutive pay stubs, you need to calculate this very very carefully.
Below that is your DEDUCTIONS. Which is the calculated number and a percentage of your gross. Remember, 401K rules for deducting money before taxes, but, others are after taxes. that is a difference between NET and GROSS deductions. There are many, so, We won’t go into details, but, you can look that up yourself. We’ll show you how in the next step.
DATES: This is probably the hardest one because it is easy to screw up. Your HIRE date, your start date, your pay date, and your PRINT date, are all different. and need to make sense. So, it’s not in the scope of this article to figure that out for you, but, think about the difference in Months, and Weekends, Holidays, etc.